Create Water Texture in Photoshop easily
Hello guys, after a few days ago I share about Create Text in Water Effect with Photoshop for beginners , today I would share about Creat...
https://xtorialco.blogspot.com/2018/12/create-water-texture-in-photoshop-easily.html
Hello guys, after a few days ago I share about Create Text in Water Effect with Photoshop for beginners, today I would share about Create Water Texture in Photoshop easily.
So, if you are searching Water Texture on the Google image, or another browser, usually that image are making by Adobe Photoshop, or other illustrator. And in here I want to make Water Texture by using Adobe Photoshop Software, with combining various effect provide by Adobe Photoshop Software.
So, why we need to make Water Texture by self if we can download for free on the Internet ?, because not all picture or not all Water Texture can meet our design needs, so some designer prefer to making by self than download on the Internet.
Then, before we are starting to Create Water Texture in Photoshop, I would share the result of this Water Texture, look at the picture below :
FYI, the result of this making Water texture , can be used for bump and displacement for the setting of Water reflection on the 3 dimension application like 3dsmax or sketchup. Oke , just follow our Photoshop Tutorial step by step.
Create Water Texture in Photoshop easily :
- STEP 1
The first step of Water Pattern Photoshop Tutorial is, make the New Worksheet or New Document by pressing Ctrl + N on your keyboard.
Then you need to set the Worksheet size, 1500 x 1000 pixels. After that give the White color for the Background.
And use a right click on the Layer > choose Convert to Smart Object.
Choose Filter menu > Noise > Add Noise > give the amount 70 % > checklist on Monochrome > click on OK button.
- STEP 2
The second step of How to make Ocean Water in Photoshop is, choose Filter menu > Blur > Gaussian Blur > Radius 5 pixels > then press Enter button.
- STEP 3
The third step of Water Pattern Photoshop is, choose Filter menu > Sketch > Chulk and Charcoal > then set like in the picture below.
- STEP 4
The fourth step of How to make Ocean Water in Photoshop is, we need to blur the image by choosing Filter menu > Blur > Gaussian blur > Radius 7 pixels > and press Enter button.
The fifth step of Water Textures Tutorial is, Add more Filter. By pressing Filter menu > Sketch > Bas Relief > Detail 2 > Smoothness : 2 > Light Bottom : 2 > and press OK button.
- STEP 6
- STEP 7
The seventh step of Adobe Illustrator Tutorials for Beginners is, choose Filter menu > Blur > Gaussian Blur > Radius : 7.5 pixels.
To give the Blur effect , you can see the Water that has waves.
Now, is the time to give the color on Water. By choosing Layer Panel > Click on Icon Adjustment > choose Gradient Map.
- STEP 9
The next step of Adobe Illustrator Tutorials for Beginners is, we need to make like in the picture above. But with other filter value.
Make the New Layer > give color for the background : white > then choose Convert to Smart Object.
After that choose Filter menu > Noise > Add Noise > Amount : 75%.
- STEP 10
You need to choose Filter menu > Sketch > Halftone Pattern > then set like in the picture below.
Size : 1
Contrast : 50
Pattern Type : Dot
- STEP 11
The next step of Water Textures is , choose Filter menu > Sketch > Bas Relief > Detail : 2, Smoothness : 2, then press Enter Button.
- STEP 12
Continue to add more Filter, by pressing Filter menu > Blur > Motion Blur > Angle : 0, Distance : 115 Pixels.
The next step of illustrator Tutorials for beginners step by step is, choose Filter menu > Blur > Gaussian Blur > Radius : 5.
- STEP 14
Then you need to set Blend Mode to the Soft light. That is to make this Layer integrated with the previous Layer.
- STEP 15
The next step of illustrator Tutorials for beginners step by step is, Add Adjustment Brightness and contrast > use a right click on Layer > choose Creater Clipping Mask.
- STEP 16
Now we will combining all image to the one layer, Press Ctrl + Shift + Alt + E. Then automatically combining layer will at the top.
 |
| Step 16 |
- STEP 17
Press Ctrl + T > use a right click and choose Perspective > the drag the bottom point until looks like in the picture below. Press Enter button.
- STEP 18
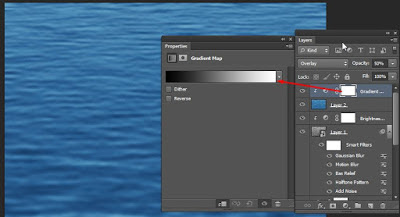
Choose Adjustment Gradient > with color from black to the white > Give Overlay on the Blend Mode and decrease the Opacity to the 50%. Or you can change the Blend Mode to the Vivid Light or Screen.
OK, thank you for visiting our Website, Read our Tutorial Article, and especially follow our Tutorial step by step. And if you guys have any Title Suggestion for the next article, you can post in comment.
And we are apologize if there is an error in our article, or you can give advice to our article, you can post in comment to.
And, just waiting for our next update. Bye.
SOURCE : https://www.grafis-media.website/2015/11/membuat-texture-air-di-photoshop.html
SOURCE : https://www.grafis-media.website/2015/11/membuat-texture-air-di-photoshop.html


Create Water Texture In Photoshop Easily >>>>> Download Now
ReplyDelete>>>>> Download Full
Create Water Texture In Photoshop Easily >>>>> Download LINK
>>>>> Download Now
Create Water Texture In Photoshop Easily >>>>> Download Full
>>>>> Download LINK eg