How to Make Wall paintings art in Photoshop
With Adobe Photoshop Software, I will make a Wall Painting art. Make a Wall Painting in Photoshop is not to difficult. We only need a pho...
https://xtorialco.blogspot.com/2018/10/how-to-make-wall-paintings-art-in.html
With Adobe Photoshop Software, I will make a Wall Painting art. Make a Wall Painting in Photoshop is not to difficult. We only need a photo or picture for the basic Object to make a Wall Painting for an example is your face, the human, and animals. And picture for a Background ( in here I use a brick wall picture ).
Oke I will start to explain the Photo Editing in Photoshop, to have a good result, please follow our tutorial step by step.
How to make a Wall painting Art in Adobe Photoshop :
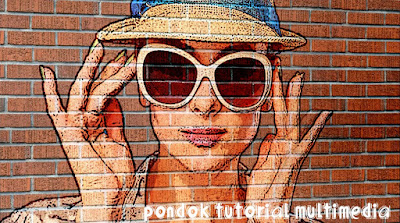 |
| The Result ( source : pondoktutorialmultimedia.blogspot.com ) |
1. The first, Opened the Photo Editor Software . And we are use a Adobe photoshop and prepare your photo for object and background.
2. The second, you must selection the photo using QUICK SELECTION TOOL, as in the picture below. And after that object has selected, you need to duplicate by pressing CTRL + J.
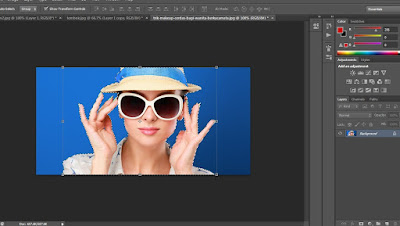 |
| Selection Object ( source : pondoktutorialmultimedia.blogspot.com ) |
3. The third, move the selected object ( Girl picture) to the Background picture ( Brick Wall Picture ), by dragging to the Brick Wall Picture.
After that click LAYER 1 ( Girl Picture ) using right click , and choose CONVERT TO SMART OBJECT . As in the picture below.
 |
| Move Object ( source : pondoktutorialmultimedia.blogspot.com ) |
4. The fourth step, you need to right click on LAYER 1, and choose BLENDING MODE. Set the STOKE. In here for the Size we choose 3.
 |
| Set the Stroke ( source : pondoktutorialmultimedia.blogspot.com ) |
5. The fifth step, I will give an effect on that photo by active on LAYER 1 ( Girl Picture ) and click FILTER menu, and choose FILTER GALERY.
After you are entering on Panel, choose ARTISTIC, and then choose FRESCO effect, and POSTER EDGES effect with the same setting.
FRESCO effect :
Brush Size : 1
Brush Detail : 10
Texture : 1
POSTER EDGES effect :
Brush Size : 1
Brush Detail : 10
Texture : 1
After Setting all effect, choose OK button.
 |
| Setting effect ( source : pondoktutorialmultimedia.blogspot.com ) |
6. In this step, active on LAYER 1 and change the BLENDING MODE to OVERLAY witch capacity 80, and don't forget to use a right click and choose CONVERT TO SMART OBJECT. And then that layer will merge into one.
 |
| Convert to Smart Object ( source : pondoktutorialmultimedia.blogspot.com ) |
7. In seventh step, we will set the point of view ( angle) . By clickyng FILE menu, next choose TRANSFROM, and then PERSPECTIF. And, you need to drag the corner image up and down.
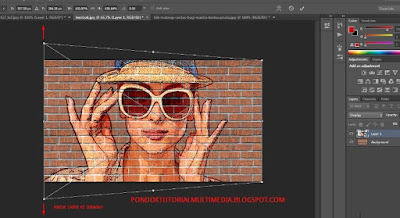 |
| Transform and prespectif the Image ( source : pondoktutorialmultimedia.blogspot.com ) |
8. Active on LAYER 1, and duplicate the image by pressing CTRL + J . And change the BLENDING MODE to SOFT LIGHT.
 |
| Change the Blending Mode ( source : pondoktutorialmultimedia.blogspot.com ) |
9. Copy the LAYER 1, By pressing CTRL + SHIFT + ALT + E. And the layer will be the image below.
 |
| Copy the Layer ( source : pondoktutorialmultimedia.blogspot.com ) |
10. In this step, we need to colouring by clickyng GRADIENT TOOL. Set the colouring as in the picture below.
 |
| Set the Colouring ( source : pondoktutorialmultimedia.blogspot.com ) |
11. The last step . Drag from side to the center, and change the BLENDING MODE to the LINIER BURN
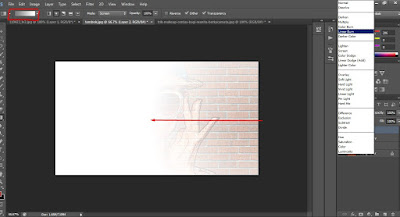 |
| Change Blending Mode ( source : pondoktutorialmultimedia.blogspot.com ) |
This is the final result. For the pretty Wall painting in Photoshop.
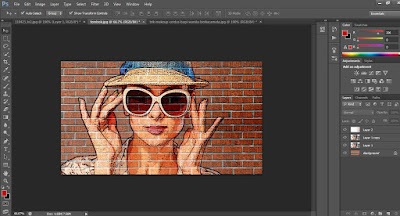 |
| The final result ( source : pondoktutorialmultimedia.blogspot.com ) |
Thankyou for reading our article, and follow our Tutorial step by step. Just waiting for our next update. Bye...
Reference : pondoktutorialmultimedia.blogspot.com


