How to do Speed art Editing use a Photoshop
Photo manipulation ideas are so famous topic between an Editors. Photo manipulation usually used to make a photo or picture more interest...
https://xtorialco.blogspot.com/2018/10/how-to-do-speed-art-editing-use.html
Photo manipulation ideas are so famous topic between an Editors. Photo manipulation usually used to make a photo or picture more interesting. One of Photo manipulation is Speed Art.
So, What is Speed art ? The term used to make artwork quickly. They are usually make an adwork in limited time.
Okay, the art speed will be the most unic Photo manipulation ideas. Let's start to edit your photo. This is the result of Speed Art. So interesting right ?.
How to do Speed Art in Photoshop :
1. Open your Photoshop Software. And open new Worksheet by choose FILE menu, and click NEW
2. We need to change the Background color became a Gray or Silver color. And then you must make a new Layer. On the new Layer you need to give a white brush, with Big size Brush. And swipe the brush on the object or photo just one more time. Look at the picture below.
 |
| Change Background Color ( source : pondoktutorialmultimedia.blogspot.com ) |
3. The next step, we need to make colouring inside a photo. By clicking LAYER button, after that choose NEW ADJUSMENT LAYER, and the last choose Curves.
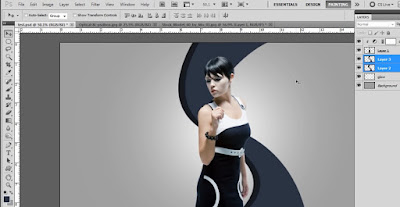
4. In 4th step, you need to make New Layer, and make an object shape as in the picture below. And give a color like in the picture below. Then, duplicate a Layer Object that we have made earlier and slide the object slightly and give the different color. As in the picture below.
 |
| Make a new object ( source : pondoktutorialmultimedia.blogspot.com ) |
5. In 5th step, we must make an object. As an object in the picture below. After that, duplicate that Object Layer and chenge the position, rotate the object, and change the color.
6. In this step, we will make lines effect. We will use a brush . If you don't have that brush. You can dowload for that aplication. The name of the brush : Infinity Brush. You can download for free.
 |
| Make the second object ( source : pondoktutorialmultimedia.blogspot.com ) |
Okay, the next you can set the lines as in the picture below, and make a different color.
 |
| Apply Line effect ( source : pondoktutorialmultimedia.blogspot.com ) |
7. After that, we are still using that brush to make a lines. But we need to change to the top one Picture Layer ( on the photo's Girl layer ). And use MASKING tool, and polist it on the object. Look at the picture below.
 |
| Make Line effect ( source : pondoktutorialmultimedia.blogspot.com ) |
8. Make a New Layer and give the lines effect, as in the picture below. And then brush as in the picture below.
 |
| Line effect ( source : pondoktutorialmultimedia.blogspot.com ) |
9. We will make cirles effect. We need to make New Layer, and make circle effect. With using a Custom Shape and can download additional shape in Internet. And brush circles effect and give the different color on each circle.
 |
| Circle Effect ( source : pondoktutorialmultimedia.blogspot.com ) |
10. In the last step, we need to give a little polish by using Lens Flare. You can finding or dowloading in Internet. And you need to put the Lens Flase top of the object. And change the Blending Mode become a Screen . And finish. Look at the result .
Ok, that's is our Tutorial about Speed Art. Thank you for reading our article, and follow the step editing photo. Just waiting aour next update. Bye..
 |
| Lens Flare Effect ( source : pondoktutorialmultimedia.blogspot.com ) |
Ok, that's is our Tutorial about Speed Art. Thank you for reading our article, and follow the step editing photo. Just waiting aour next update. Bye..
reference : source : pondoktutorialmultimedia.blogspot.com


