How to use Coreldraw to design a Logo, simple step
Hello guys, in here I would share about How to use Coreldraw to design a Logo . And if you guys like Windows Vista Logo, in here I would e...
https://xtorialco.blogspot.com/2018/11/how-to-use-coreldraw-to-design-logo.html
Hello guys, in here I would share about How to use Coreldraw to design a Logo. And if you guys like Windows Vista Logo, in here I would explain the Coreldraw Tutorial.
You need to prepare Corel Draw X3 Application. A Windows Vista Logo as an example. To get Windows Vista Logo, you can search via Google. By typing "Vista logo", and try to get the Logo as in the picture below.
 |
| Windows Vista Logo |
Ok, guys in here I will make 3d Logo Design in Coreldraw, please follow our tutorial step by step. And be patient, to get the satisfying result.
How to use Coreldraw to design a Logo, simple step :
1. The first Import your Windows Vista Logo, by clicking File menu.
2. Make a circle above that image file, to get the same circle size. Press CTRL button on keyboard to get a simmetrical circle size. If it is already, click and move the circle to the beside original picture. As in the picture below :
 |
| ( source :kangtanto.com) |
3. Give a color to that circle. Open the Fill Color Dialog and input the CMYK value as in the picture below. C : 92, M : 79, Y:41, K:34. The result must be the picture below.
 |
| Fill Color Dialog on the Tool Box ( source :kangtanto.com) |
 |
| Coloring result ( source :kangtanto.com) |
4. The next step How to Use Coreldraw to design a Logo , is make the gradations from below. From that, you need to make a small circle at the bottom of circle. And fill the color, with color value C:75, M:23, Y:1, K:0.
 |
| ( source :kangtanto.com) |
5. So that the result are smoother, we need to remove the edge of both circle. We need to click "No Outline " to remove the edge of circle. highlight both image, and remove the outline.
 |
| Remove the outline ( source :kangtanto.com) |
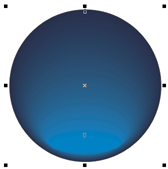
6. The sixth step of How to use Coreldraw to design a Logo Tutorial is , make a gradient , highlight both of circle while pressing "Shift" button , or by the other by as you want. Then click on "Effect" menu and choose "Blend". Insert the value : 60 on "Number of steps " and choose Apply.
 |
| Dialog Box on Blend ( source :kangtanto.com) |
And the result must be like the picture below.
 |
| ( source :kangtanto.com) |
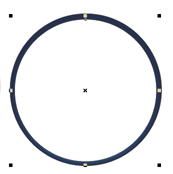
7. In the next, we will make a gradient at the top . Make the smaller circle that the first circle. And fill by using White color.
 |
| ( source :kangtanto.com) |
8. To make a gradient, click on the circle that you just created. And in the tools choose "Interactive Transparency Tool ". Put or click the mouse above the biggest circle with the sequence in the middle vertical line of the circle. Then drag the mouse to the bottom almost to the midpoint of the circle and release the mouse. And the new Gradient has been made.
 |
| Tranparency Tool ( source :kangtanto.com) |
 |
| To do drag and Tranparency ( source :kangtanto.com) |
9. The next step, make the typical window of Microsoft . In here we will use sample Picture that we are import. Point your Desktop to the Windows Vista Logo. On the tools, choose "Bexier Tool".
 |
| Bezier Tool ( source :kangtanto.com) |
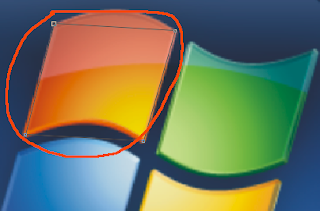
Then, we will draw one by one that Window box. We will start from top left. Make sure you have chosen Bezier Tool, and after that click on the top left corner Orange Window Box, then click to the top right corner, and continue to click on bottom left corner , then click on bottom right corner. And the last click on the beginning of point, in the Top Left Corner.
 |
| The result ( source :kangtanto.com) |
10. Then by using "Pick Tool", double click on the box you just create, until by automatically will activate "Shape Tool". Use a right click on the top of line, and choose "To curve ", then will show up the arrow from that box. Click on the arrow and drag to the top until shape according to the Window box. Do the same step to the bottom line.
 |
| Click in Arrow to make a Window ( source :kangtanto.com) |
11. Do the same step to get the other shape of the Window. Then copy the all window to the our logo, by clicking on the original box, the drag and hold to the destiny place ( our logo ) , before you release your click, do right click, then release the click ( left click).
12. After you are drawing that 4 box, you need to activate by clicking each box while pressing "Shift" button. And drag to the center of circle that you made.
 |
| The result of Window ( source :kangtanto.com) |
I made a change the edge of Outline Color is White. You can do that by choose "Outline Color Dialog " and choose the White color.
 |
| Choose Color Outline Dialog ( source :kangtanto.com) |
13. Then we will give the color on each box. For the top left corner box, choose "Fill Color Dialog" and insert CMYK value. C: 13, M:83, Y:100, K:4
 |
| ( source :kangtanto.com) |
Do the same step to each box.
Top Right corner : C:87, M:26, Y:100, K:2
Bottom Right corner : C:5, M:27, Y:100, K: 0
Bottom Left Corner : C:90, M:65, Y:8, K:1, the result will be like the picture below.
 |
| ( source :kangtanto.com) |
Remove the Outline to that all box.
14. In here we will make the gradient on each box. Click on orange box. On the tools choose "Interactive Mesh Tool "
 |
| ( source :kangtanto.com) |
When you are choose Interactive Mesh Tool, the the display box will change. The put your mouse to the Bottom Left Corner Orange Box, and do the drag to the top left.
 |
| Do the drag as the arrow ( source :kangtanto.com) |
If it success, the the new point will show up on the Right line. After that, on the color choice beside Right Window Corel, choose the yellow color. Then the result will be as in the picture below.
 |
| ( source :kangtanto.com) |
15. And we need to continue to the Green Box , On the tool choose "Pick Tool " and click on the Green Window box. The next click on "Interactive Mesh Tool ". Then do like the picture below.
 |
| ( source :kangtanto.com) |
Then choose white color. And you will get the result like in the picture below.
 |
| ( source :kangtanto.com) |
16. Then use the same step to the Yellow box. Choose "Interactive Mesh Tool " and do like the picture below. And choose White color for the Gradient.
 |
| ( source :kangtanto.com) |
17. Then choose Blue Window Box. Change the color because the Blue color are to dark. ( Sorry )
Choose the color from Color box on the right side of your Corel Desktop. Then click OK.
We will continue make the gradient, by using the same step. Choose "Interactive Mesh Tool " , point your drag from the Top Right Corner to the Bottom left Corner. The result will be like this picture below :
 |
| The last result with blue color change ( source :kangtanto.com) |
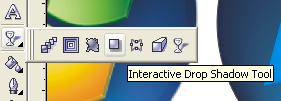
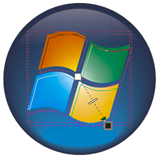
18. To make the result more attractive and good, we will make the Shadow Effect to all box. While pressing "Shift " button, click on each box by using "Pick Tool". Then choose "Interactive Drop Shadow tools" on the Tool.
 |
| ( source :kangtanto.com) |
Then put your mouse on center of all box, and do the drag to the Bottom Left Corner.
 |
| ( source :kangtanto.com) |
19. And this is the result.
 |
| The result ( source :kangtanto.com) |
Thanks for the following our Cool illustrator Tutorials, thanks for reading our article. And wait for the next article. Bye...
reference : http://kangtanto.com/tutorial/membuat-logo-vista-dengan-coreldraw-x3


How To Use Coreldraw To Design A Logo, Simple Step >>>>> Download Now
ReplyDelete>>>>> Download Full
How To Use Coreldraw To Design A Logo, Simple Step >>>>> Download LINK
>>>>> Download Now
How To Use Coreldraw To Design A Logo, Simple Step >>>>> Download Full
>>>>> Download LINK fK