How to Create Typography arts in Corel Draw
Hello guys, today we will talk about Typography design or Typography art . Before we are starting to make this, let me explain what's...
https://xtorialco.blogspot.com/2018/10/how-to-create-typography-arts-in-corel.html
Hello guys, today we will talk about Typography design or Typography art. Before we are starting to make this, let me explain what's the meaning of Typography .
Typography, the art of printing, or typesetting is an art and technique of selecting and arranging letters with the arrangement of the spread in the available space. To create a certain impression, for the convinience of reading as much as posible.
Also know as type design, that is creation or design which is use setting a letter as a main elemen.
And that is the meaning of Typography, and in here we will make a Corel Draw Tutorial. And I will discuss about Typography Design Tutorial. If you want to know the result of Photo Editing Corel Draw, look at the picture below :
 |
| Result |
That Typography Design are so beautiful, and attractive right ?. If you want to make like that picture, let's follow our Tutorial, How to create typography. And please follow our Tutorial step by step.
How to Create Typography art in illustrator :
1. For the important note, in here I am using Corel Draw for the illustrator, and the version is Corel Draw X5, but if you don't have this version. It's up to you for using any version.
The fors step, open you Corel Draw software.
2. The second, you need to import your photo or picture that is want to make a Typography art. It's up to you for using any picture. Import the picture by clickyng File menu > Import (Ctrl + L).
 |
| Step 2 ( Source : pondoktutorialmultimedia.blogspot.com) |
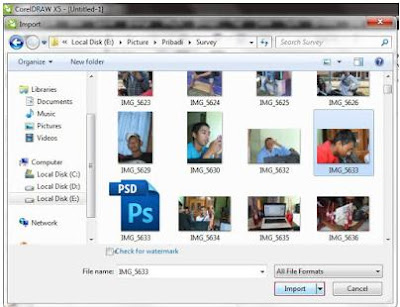
3. Choose the picture do you want to use. In here I am using the photo of boy. If you have found the photo you want, click Import.
 |
| Step 3 ( Source : pondoktutorialmultimedia.blogspot.com) |
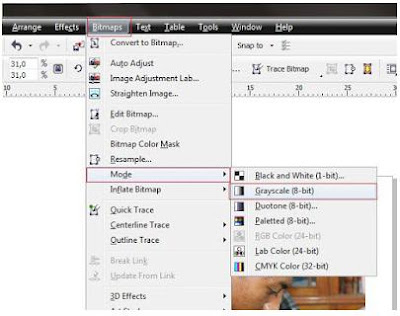
4. Then click that picture and after that click Bitmaps menu > Mode > Grayscale ( 8 bit), as in the picture below.
 |
| Step 4 ( Source : pondoktutorialmultimedia.blogspot.com) |
5. In this step you will see the result will be like the picture below.
 |
| Step 5 ( Source : pondoktutorialmultimedia.blogspot.com) |
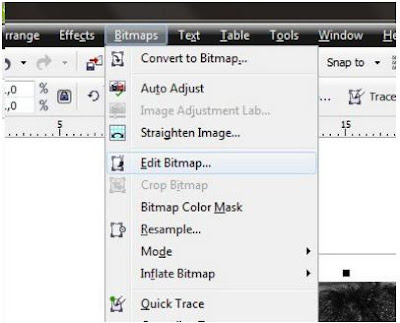
6. In the sixth step, you need to click Bitmaps menu > Edit Bitmap .... look at the picture below.
 |
| Step 6 ( Source : pondoktutorialmultimedia.blogspot.com) |
7. In here that will came out is COREL PHOTO PAINT Application. In here we will set the Contrast, by clicking Adjust menu > Brightness/ Contrast /Intensity ( Ctrl + B), as in the picture below.
 |
| Step 7 ( Source : pondoktutorialmultimedia.blogspot.com) |
8. You can set as in the picture below, or set the picture as you want.
 |
| Step 8 ( Source : pondoktutorialmultimedia.blogspot.com) |
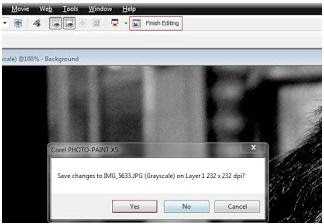
9. After that click Finish Editing, and choose YES button.
 |
| Step 9 ( Source : pondoktutorialmultimedia.blogspot.com) |
10. In this step, you will back to CORELDRAW applications. And the result after editing will be like this picture below.
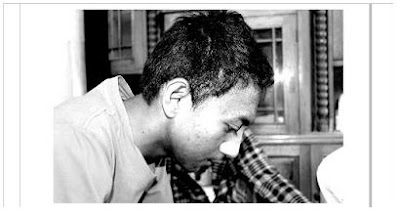 |
| Step 10 ( Source : pondoktutorialmultimedia.blogspot.com) |
11. In this eleventh step, you need to continue photo editing by clickyng Effect > Transform > Posterize..
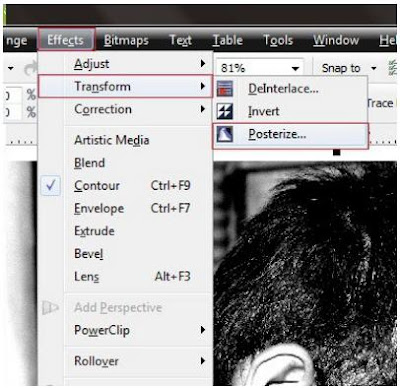 |
| Step 11 ( Source : pondoktutorialmultimedia.blogspot.com) |
12. Then, please set as in the picture below. Level : 7 . And then click Ok button.
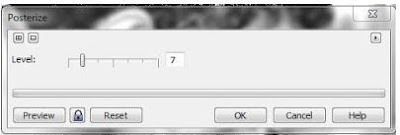 |
| Step 12 ( Source : pondoktutorialmultimedia.blogspot.com) |
13. In this step, you need to choose or using Pen Tool, then make a line following your object shape. Look at the picture below.
 |
| Step 13 ( Source : pondoktutorialmultimedia.blogspot.com) |
14. After selected the object, In the next selection the photo and the line. And click Intersect .
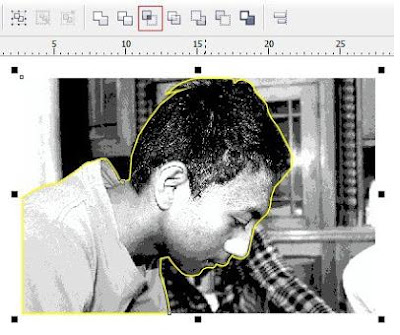 |
| Step 14 ( Source : pondoktutorialmultimedia.blogspot.com) |
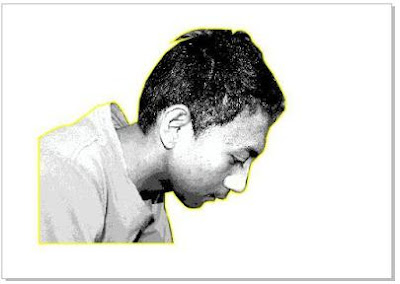
15. In this step, you need to delete the picture outside the object line. Note : don't delete the yellow line around the object.
 |
| Step 15 ( Source : pondoktutorialmultimedia.blogspot.com) |
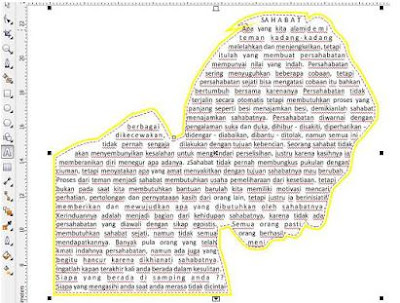
16. Then, use a Text Tool (F8), and copy-paste a text to the object or inside the yellow line ( you can use any text ). After copy and paste, set the distance. Then, use a right click and choose Corvert to Curve. As in the picture below.
 |
| Step 16 ( Source : pondoktutorialmultimedia.blogspot.com) |
17. Click the image and click Effect menu >Power Clip > Place Inside Container , and point the arrow to the text.
 |
| Step 17 ( Source : pondoktutorialmultimedia.blogspot.com) |
18. Then, set the position image to make same as the position of the text object. And remove the color of text object. And this is the result.
 |
| Result ( Source : pondoktutorialmultimedia.blogspot.com) |
You can add more editing in that image, to make it more attractive, I know you can make better than me. Ok that is our CorelDraw Tutorial. Thanks for following our How to Create Typography art in illustator tutorial.
Just waiting for out next update.
reference :
https://id.wikipedia.org/wiki/Tipografi
http://pondoktutorialmultimedia.blogspot.com/


How To Create Typography Arts In Corel Draw >>>>> Download Now
ReplyDelete>>>>> Download Full
How To Create Typography Arts In Corel Draw >>>>> Download LINK
>>>>> Download Now
How To Create Typography Arts In Corel Draw >>>>> Download Full
>>>>> Download LINK 1J